“`html
How to Properly Paint a Room for a Fresh Modern Look in 2025
Painting a room is an exciting way to refresh your space and express your personal style. With new trends and techniques emerging every year, there’s plenty to consider for achieving a fresh modern look in 2025. Whether you’re a DIY enthusiast or planning to hire a professional painter, this comprehensive guide covers essential room painting tips, interior painting techniques, and insights into choosing paint color. Let’s dive into the various steps to transform your space effectively.
Preparing Your Room for Painting
Before diving into paint application, proper preparation is crucial for achieving flawless results. This phase lays the groundwork for a successful paint job and can significantly affect the final outcome. Proper room preparation for painting involves several steps including moving furniture, protecting surfaces, and ensuring an optimal workspace. A well-prepped room not only reduces mess but also enhances the overall efficiency of your painting project.
Moving and Protecting Your Furniture
Start by moving furniture away from the walls to create ample space for working. It’s essential to cover your furniture with drop cloths or plastic sheeting to protect it from paint splatter. Depending on the scope of the project, consider relocating larger pieces to an alternate room to increase workspace. The goal is to minimize distractions and maintain a clean environment, making your painting experience more enjoyable and less stressful.
Surface Preparation Techniques
Once the room is cleared, you need to prepare the surfaces that will be painted. This involves cleaning the walls, sanding any rough areas, and filling in holes or cracks with spackle or filler. Depending on the previously painted surfaces, you may need to use primer to ensure even color coverage. Proper surface preparation is paramount; it ensures the paint adheres properly and reduces the likelihood of future flaking or peeling.
Setting Up Your Painting Station
After preparing the surfaces, it’s time to set up your painting station. This involves organizing your painting tools and equipment, such as brushes, rollers, and paint trays, to streamline the process. Having everything within arm’s reach saves time and allows for a smoother painting experience. Incorporate a variety of painting tools and equipment suited to your project size—large rollers for big walls, and finer brushes for intricate details.
Choosing the Right Paint Color and Finish
The color you choose for your walls significantly influences the mood and aesthetic of your space. Hence, understanding color psychology and selecting the right hues is crucial. Research current trends, and consider factors like lighting and room size when deciding on a color scheme. Exploring different paint types enhances your options, enabling you to achieve the desired effect for your room.
Testing Paint Colors
Before committing to a color, always test with samples. Purchase small quantities or paint swatches and apply them to the wall in various lighting conditions. This is a vital step in blend colors and determining how they interact with your space. It provides insight into undertones and allows you to experiment with different shades to find the perfect palette for your interior.
Understanding Paint Sheens
Paint finishes or sheens significantly affect how color looks and performs over time. The choices are usually flat, satin, eggshell, semi-gloss, and gloss. Each one serves a different purpose with specific advantages for application areas. For instance, a satin or semi-gloss finish is often recommended for high-traffic areas, while a matte finish can lend a soft, cozy feel to serene spaces. Understanding paint sheens enables you to make informed decisions about choosing paint finish that meets both aesthetic and functional needs.
Applying the Paint: Techniques and Tips
With your preparation complete and color(s) selected, it’s time to start painting! Application techniques can vary from roller to brush methods, but there are foundational principles that apply across the board. Using proper paint application techniques ensures your finished work meets professional standards, helping avoid common pitfalls.
Rolling Paint and Cutting In the Edges
The most critical step in application is knowing how to distribute paint evenly with a roller while carefully cutting in the edges. For best results, start the process by ‘cutting in’ using a brush along edges, corners, and trim with painter’s tape for clean lines. Afterward, follow up with a roller for larger areas. This method ensures even coverage and a polished finish, essential for creating a modern look.
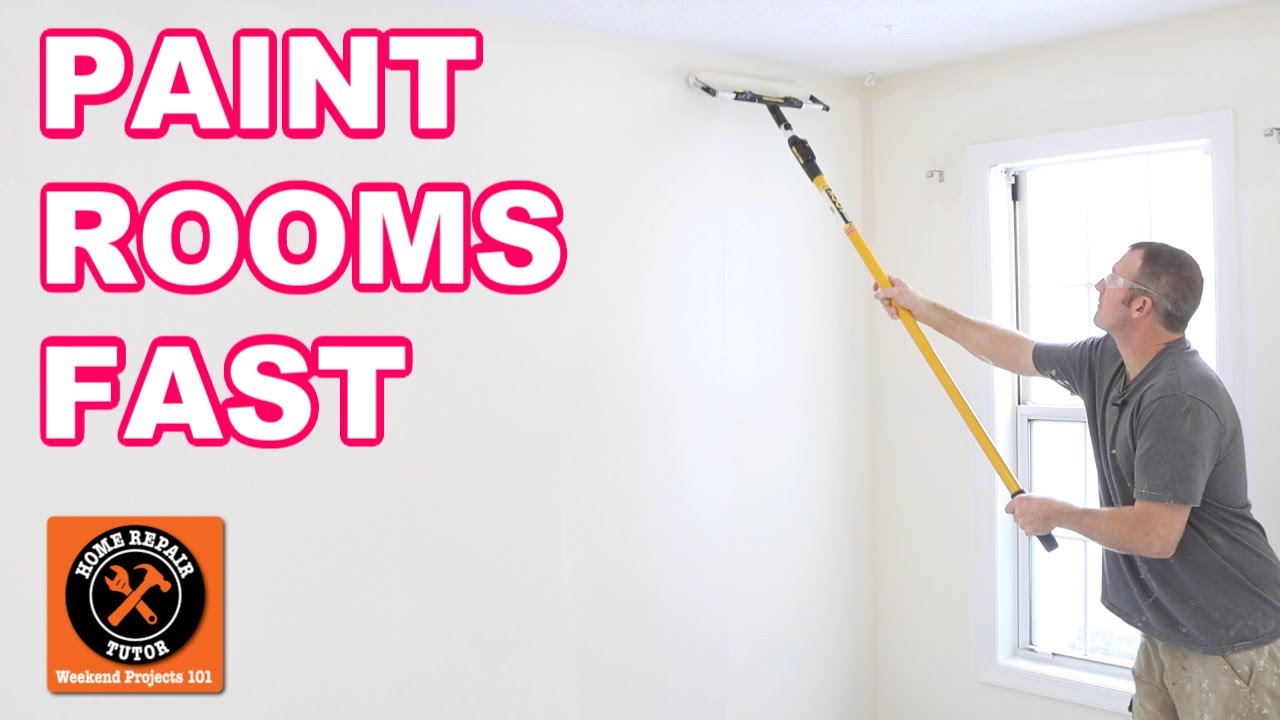
Ceiling and Trim Painting Techniques
When it comes to painting the ceiling or trim, patience and precision are key. Oftentimes, these segments require a different approach and specific tools related to their texture and style. For ceilings, investing in a good-quality roller and applying the paint in a zig-zag or W pattern can help achieve uniform coverage. For trim, higher gloss paints can accentuate architectural details, making them stand out against the backdrop of your chosen wall color.
Safety Precautions and Cleanup After Painting
Your health and safety during a painting project must never be compromised. Always wear appropriate protective equipment for painters, including masks, goggles, and gloves. Ensure **ventilation while painting** to reduce exposure to fumes. Safety cannot be neglected at any stage of the project; following conventional guidelines protects both you and your space.
Important Safety Gear for DIY Painting
Invest in effective safety gear, especially if you’re tackling extensive interior work. Quality masks filter harmful particles, and goggles shield your eyes from splatters. Always ensure that your workspace is well-ventilated to avoid overwhelming paint fumes. You can also use eco-friendly paints to further reduce health risks while contributing positively to the environment, especially when **considering environmental impact of paints**.
Tools for Cleanup After Painting
After completing the task, the final important phase is cleanup. This involves properly cleaning your tools like brushes or rollers, as well as ensuring leftover paint is stored correctly or disposed of according to local regulations. Proper paint disposal is vital for reducing environmental impact. Cleaning brushes and rollers can extend the life of your painting tools, helping you gear up for future projects.
Key Takeaways
- Preparation is key: move furniture and protect surfaces to prepare your space.
- Choose the right paint color and finish while considering your room’s lighting and size.
- Employ proper techniques when painting edges and applying paint to achieve an even finish.
- Prioritize safety through protective gear and ventilation.
- Clean up efficiently after your project to ensure tools are ready for future use.
FAQ
1. How do I decide on the best paint color for a room?
Choosing the best paint color involves considering various factors, such as your room’s purpose, natural light exposure, and personal preferences. Start by evaluating existing furniture and decor to ensure color coordination. Obtaining test samples can also help because it allows you to visualize the color in your space at different times of day, enhancing your decision-making process.
2. What safety precautions should I take when painting a room?
Prioritizing safety during painting involves wearing protective gear like masks, gloves, and goggles, as well as ensuring good ventilation. Regular breaks in fresh air can help minimize inhalation of paint fumes. Also, employing proper techniques for using ladders or tools ensures a safer work environment, allowing you to focus on achieving a stellar paint finish without mishaps.
3. How can I avoid paint runs when painting?
Avoiding paint runs is primarily about technique and the right tools. Apply paint in thin, even layers instead of attempting to achieve full coverage in one go. Use quality Painter’s tape to protect edges and guide even application. Keeping a wet edge while rolling helps to blend layers, leading to a seamless finish and avoiding those dreaded runs.
4. What tools do I need for a DIY painting project?
Your essential toolkit should include paint rollers, brushes, trays, painter’s tape, drop cloths, and cleaning supplies. Additionally, having a good-quality primer and filler on hand can enhance results. Understanding paint application methods goes a long way in ensuring an efficient process and maintaining good control during execution.
5. Is it necessary to prime before painting?
Using a primer before painting helps to seal the surface and ensures better adhesion of the paint, ultimately leading to an even more vibrant finish. It’s especially beneficial when painting over stains, raw surfaces, or previously unpainted surfaces. Skipping primer could lead to more coats of paint being required for optimal finish.
“`