Essential Guide to How to Jump a Battery
Understanding the Basics of Jump-Starting a Battery
When faced with a dead battery, knowing **how to jump a battery** is invaluable. Jump-starting a battery can swiftly revive your vehicle, bringing it back to life in moments. Before delving into the specifics, it’s crucial to familiarize yourself with the types of batteries and how they function. Modern vehicles often employ a lead-acid battery system, where energy is stored and released through chemical reactions. It’s important to understand that different battery types, such as AGM or lithium-ion, require varied approaches in maintenance and jump-starting. Ensuring that you use appropriate tools, notably **battery jumper cables**, is paramount for safety and efficiency when performing a jump-start.
Getting the Right Equipment for Jump-Starting
To properly jump-start a vehicle, having the right equipment is essential. The two main items you need are **jumper cables** and a working vehicle or a **portable jump starter**. When selecting **jump-starting tools**, it’s wise to invest in high-quality, insulated cables that are long enough to connect safely between vehicles. A good rule of thumb is to look for cables with a minimum 4-gauge thickness for efficient power transfer. If you opt for using a **portable jump starter**, ensure it’s charged and suitable for your vehicle’s battery. Having these tools prepared can save you from the hassle of unexpected breakdowns, demonstrating why **car battery maintenance** is crucial in prolonging battery lifespan.
Safety Tips for Jump-Starting Your Vehicle
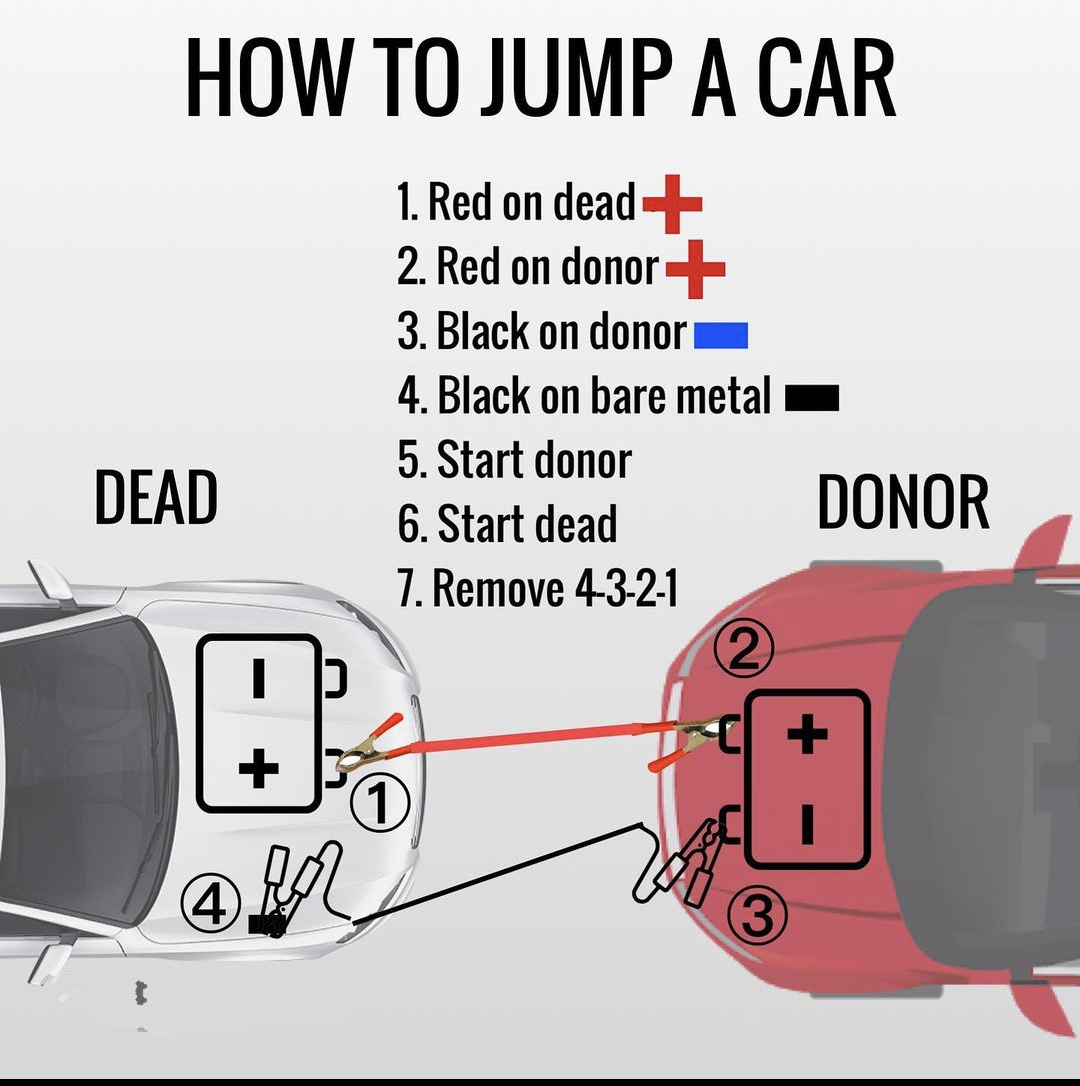
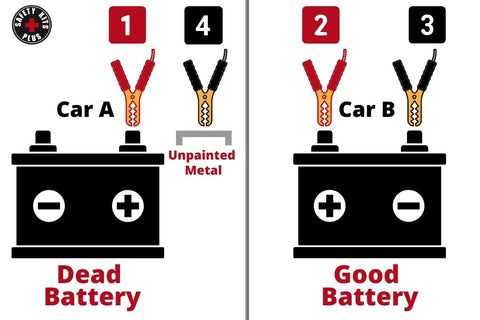
Safety must be the priority before attempting to **jump-start a dead battery**. Start by wearing safety goggles to protect your eyes from potential battery acid. Additionally, always perform the jump-start in a well-ventilated area to prevent fumes from accumulating. When connecting cables, always attach the **positive cable connection** first to the dead battery, followed by the good battery’s positive terminal. Afterward, connect the negative cable to the good battery and attach the other end to a metal unpainted section of the car with the dead battery; this helps minimize sparks near the battery. Following these **jump-starting safety precautions** can prevent accidents, ensuring a safe boost.
The Correct Jump-Starting Procedure
Once you have equipped yourself with the right tools and outlined the necessary safety precautions, you can proceed to the **battery jump procedure**. Understanding this step-by-step approach is fundamental for beginners as well as seasoned drivers. Firstly, ensure both vehicles are turned off. Begin by connecting the **battery terminals**, which involves prioritizing the positive terminals. Once connected, ask the helper to start their vehicle. Allow their engine to run for a few minutes to enable the dead battery to absorb the charge. It’s advisable to then try to start your vehicle. If it doesn’t start after several attempts, you may need to check your system for more significant **engine starting problems** before proceeding.
Step-by-Step Jump-Starting Steps
Here’s a detailed look into the required steps to jump-start your vehicle:
- Position one vehicle with a good battery close enough to allow for the **battery jumper cables** to reach both vehicles.
- Securely attach the positive cable to the positive terminal of the dead battery.
- Connect the other end of the positive cable to the working battery’s positive terminal.
- Attach the negative cable to the negative terminal of the working battery.
- Instead of connecting the negative to the dead battery, attach it to an unpainted metal surface away from the battery.
- Start the engine of the functional vehicle and let it run for a few minutes.
- Attempt to **jump-start a vehicle** by igniting the engine of the car with the dead battery.
- If successful, remove cables in reverse order, starting with the negative from the newly started vehicle.
This simple yet effective procedure highlights the fundamentals of **jump-starting a vehicle** while underscoring protective actions throughout the process.
Troubleshooting Common Battery Issues
As a driver, being prepared for **troubleshooting battery issues** is advantageous. Common signs include dimming lights or difficulty when starting your engine. If the jump-start is unsuccessful, assess the **battery health check** to identify if replacement is required. Frequently check for issues with the **battery terminals**, which can corrode and interfere with connections. A clean, tight connection enhances battery performance. Regular maintenance and checks can obviate the need for sudden jumps, ensuring your vehicle runs smoothly.
Using a Portable Jump Starter: A Modern Alternative
With advancing technology, using a **portable jump starter** is becoming increasingly popular. These compact devices offer a convenient way to jump-start a vehicle without requiring another car. They not only eliminate the hassle of finding another vehicle but also provide a straightforward process. Understanding how to use these jump starters is essential. It involves charging the starter beforehand, ensuring compatibility with your vehicle, and connecting it to the **car battery connections** following the owner’s manual. Utilizing this technology allows for greater independence, especially in emergency situations.
Benefits of Portable Jump Starters
One of the primary advantages of using a **portable jump starter** is the convenience it offers. You can store it in your glove compartment and summon its help whenever needed. Moreover, it prevents reliance on others when you find yourself stranded with a dead battery. Also, many portable options come equipped with additional features such as USB ports for charging devices, air compressors, or LED lights, which add valuable functionality beyond just jump-starting capability. Familiarity with different **jump-starting accessories** enables you to be prepared for various situations.
Maintenance and Care of Portable Jump Starters
Maintaining your portable jump starter is fundamental for ensuring it performs well when needed. Periodically check your unit to ensure the battery remains charged, especially prior to long journeys or seasonal changes. Attention to maintain connection points and ensuring cables are free from damage sustains efficiency in performance. Regular **battery maintenance** routines should incorporate checks of portable jump starters in your overall vehicle care plan to ensure optimal readiness.
Techniques for Jump-Starting in Different Conditions
The effectiveness of jump-starting can be influenced by various environmental conditions. Strategies may vary based on factors such as cold weather or hot weather effects on batteries. Understanding these differences can aid in executing successful jump starts and troubleshooting when necessary. Cold temperatures can drastically reduce battery performance. If you attempt to **jump-start in cold weather**, try to keep metal parts covered and insulated to minimize battery freeze impact. On the other hand, extreme heat can accelerate battery wear, signifying the importance of regular checks on your battery locator as part of **battery maintenance** procedures.
Best Practices for Jump-Starting in Cold Weather
When handling jump-starts in low temperatures, ensure that both vehicles are prepped adequately; for instance, warm up the battery of the car providing the jump, as this can enhance power flow. Implement protective measures on cabling to prevent freezing. Extend attempts to charge by letting the vehicle providing the boost run longer than usual. Don’t forget that numerous *car battery types* may react differently in freezing conditions; thus, familiarity with your **car battery specs** can guide you in adapting your strategy effectively.
Jump-Starting in Extreme Heat
Conversely, extreme heat can lead to excessive battery wear and sudden failures. To mitigate risks, consider parking directly under shade or using sun shields to lower internal temperatures. Utilizing a battery maintenance schedule can assist in recognizing performance issues prior to needing a jump-start. Monitor corrosion on **battery terminals**, and keep the electrical systems in check ensuring everything remains functional for the hot months.
Key Takeaways
- Understanding **how to jump a battery** is crucial for any driver’s knowledge base.
- Utilizing proper equipment is fundamental when conducting jump-starts safely.
- Emphasizing maintenance and checking connections regularly can prevent common pitfalls in battery performance.
- The choice between **using a portable jump starter** and utilizing another vehicle enhances your readiness for battery issues.
- Environmental factors significantly affect battery health and performance, requiring tailored jump-starting approaches.
FAQ
1. How long does it take to jump-start a dead battery?
Typically, once the connections are made, it can take about 5 to 10 minutes for the dead battery to receive a sufficient charge. Ensuring the assisting vehicle is running optimally can further quicken the process.
2. Can I use my jumper cables on all battery types?
While jumper cables can work across various standard battery types, caution should be exercised. Different batteries, like AGM or lithium-ion, may have specific requirements, so consult your vehicle’s manual for compatibility.
3. What are some signs my battery may need to be replaced?
Common signs of a failing battery include slow engine crank, swelling battery casing, or an illuminated battery warning light on the dashboard. Regular diagnoses paired with **battery maintenance** can help identify these issues early.
4. Can I jump-start a vehicle with jump starters during winter?
Yes, but the cold can hinder battery efficiency. Be sure to keep jump starters insulated and perform regular checks on battery voltage during colder months for optimal performance.
5. What are some common jump-starting mistakes to avoid?
Some mistakes to avoid include incorrect cable connections, not wearing safety gear, and neglecting to check battery compatibility. Following safe, **jump-starting etiquette** is essential to prevent accidents.
6. How often should I check my battery’s health?
It’s recommended to check your battery’s health at least once every six months during routine maintenance checks. This can preemptively counteract potential failures.
—
You can view relevant images here:

For additional information, you can refer to the direct links to relevant topics:
[link 1](https://fixskill.info/?p=1318)
[link 2](https://fixskill.info/?p=1313)