How to Screenshot on Chromebook: Effective Ways to Enhance Productivity in 2025
Understanding Screenshot Options on Chromebook
Screenshots are an essential tool for students, professionals, and anyone who works extensively on a Chromebook. Learning **how to screenshot on Chromebook** effectively can streamline your workflow and enhance your productivity. Different methods of screenshotting exist, and recognizing the options available allows for quicker captures. Whether you want to remember an important webpage, capture coursework for later use, or share something with colleagues, the **screenshot options on Chromebook** empower you to achieve efficient screen captures with ease.
Chrome OS Screenshot Shortcut
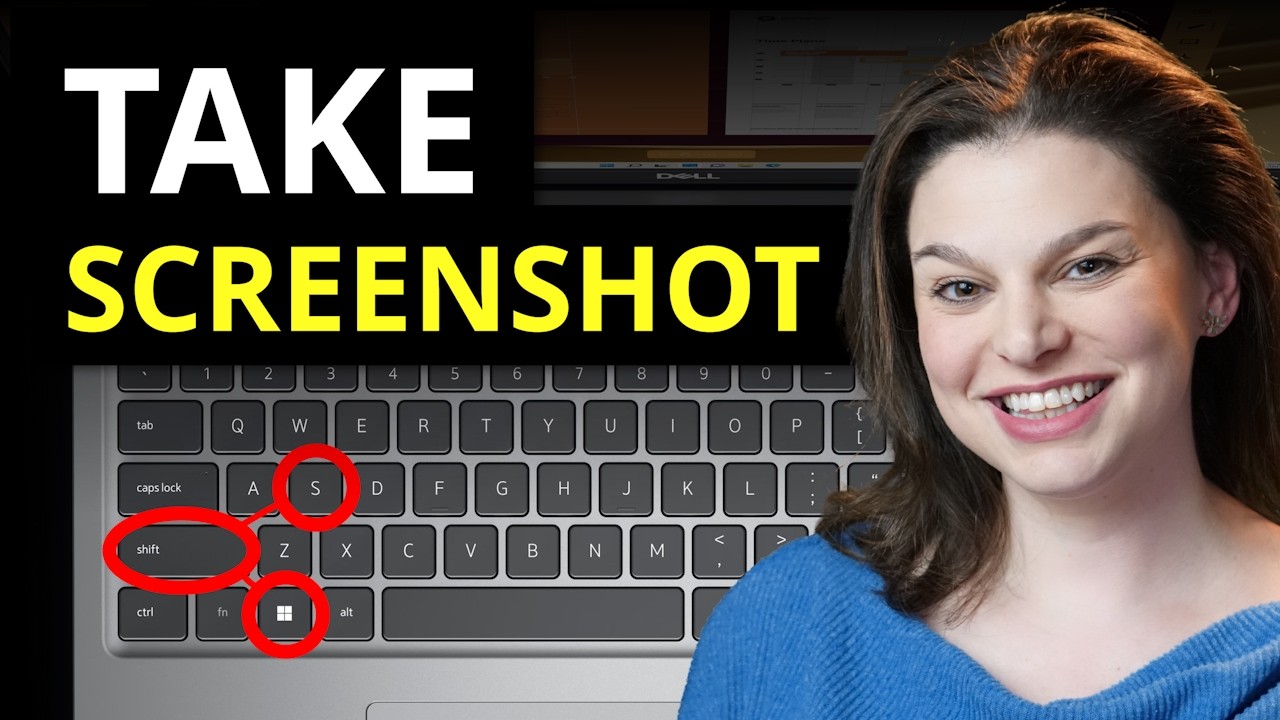
Knowing the **Chrome OS screenshot shortcut** can significantly speed up your screen capturing process. On an average Chromebook, you can take a full-screen screenshot by pressing the Ctrl + Show Windows keys. The Show Windows key looks like a rectangle with two lines next to it, situated in the top row of your keyboard. Additionally, if you only need to capture a portion of your screen, pressing Ctrl + Shift + Show Windows enables you to select a specific area by dragging your mouse over it. This functionality not only allows for more targeted captures but also preserves screen space by focusing only on essential content.
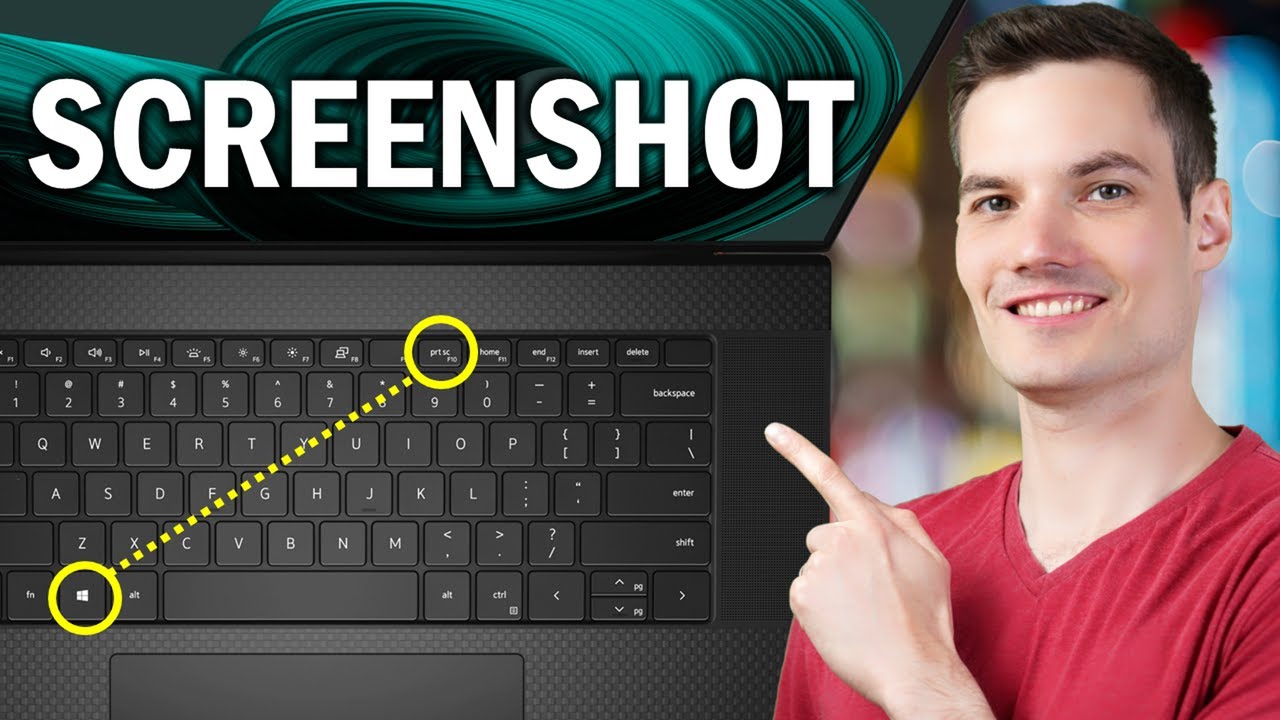
Print Screen Chromebook
The **Print Screen Chromebook** function also simplifies the task of capturing images. Unlike traditional laptops, Chromebooks utilize different shortcuts and applications. The functionality of the Print Screen feature on your Chromebook will help you quickly save what you see on your screen with just a combination of keys. Make sure you integrate the insights from this guide to familiarize yourself with these combinations and demonstrate your newfound skills efficiently.
Saving Screenshots on Chromebook
Once you have taken a screenshot, knowing **how to save a screenshot on Chromebook** is essential. Photos taken via the built-in screenshot tool will automatically be saved to your **Files** under the “Downloads” section. You might wonder about the organizational aspects of **screenshot file location on Chromebook**. It’s advisable to create folders within your Drives to categorize screenshots for easier access later. This can help you quickly find saved shots for reports, presentations, or collaborative efforts without fumbling through folders.
Using Screenshot Toolbar Chromebook
For enhanced functionality while screenshotting, use the **screenshot toolbar on Chromebook**. This feature can be accessed by pressing Ctrl + Shift + Show Windows. The toolbar provides quick access to capturing different types of screenshots, including full screen, partial captures, and even screencasts. The specificity offered by the toolbar allows users to decide whether they want a simple dip into saving ideas or a comprehensive approach to capture multimedia presentations for distribution.
Editing Screenshots on Chromebook
Editing your screenshots after capturing can make your images more informative and visually appealing. Learning **how to edit screenshot on Chromebook** can be beneficial as it also reduces the need for third-party applications. Chromebook’s built-in tools, located in the image viewer after the screenshot is taken, enable annotations, cropping, and highlighting of key areas directly on the image. By mastering this process, you’ll become more adept at producing clear, professional-looking visuals for reports, projects, or sharing within your educational workshops.
Different Methods to Screenshot on Chromebook
In addition to keyboard shortcuts, there are various ways to **take a screenshot on Chromebook**. Exploring options outside traditional methods encourages you to utilize all the functionalities your device offers.
Using Snipping Tool Chromebook
Many Chromebooks offer a native **snipping tool** function similar to what you might find on other platforms. This tool is a fantastic option for detailed screen images. To access it, you can check your settings or utilize search functions. This native application allows you to select specific portions of your screen with astounding ease, providing options akin to those available in other traditional screenshot functions. For users accustomed to working with screen captures in different environments, this feature blends familiarity and functionality seamlessly.
Taking Screenshots Without Keyboard
Not all users prefer keyboard shortcuts for their images. For those seeking alternatives, learning **how to take a screenshot without keyboard** is practical. Many Chromebooks offer touchscreen capabilities, enabling users to make screenshots using tap and swipe gestures. Simply tap the notifications panel, select Screen Capture, and choose the area you want to copy. For users transitioning from other devices, this alternative might feel more accessible and natural.
Using Third-Party Tools for Screenshots
While built-in screenshotting capabilities are remarkably robust, there can be times when you may need more features or specialized options. Exploring **using third-party screenshot tools** is beneficial for individuals seeking additional functionality.
Best Screenshot Apps for Chromebook
Your search for top-tier **best screenshot apps for Chromebook** could lead you to tools like Lightshot, Nimbus Screenshot, or Awesome Screenshot. These tools offer enhanced capabilities, including screen recording, collaborative annotations, and detailed editing specifications. Utilizing these as a supplementary solution can improve your overall experience and streamline tasks that rely heavily on visual documentation.
Sharing Screenshots on Chromebook
Once screenshots have been captured and potentially edited using favorite tools or apps, **sharing screenshots Chromebook** can become a pivotal next step for collaborative projects. Most applications on devices allow simple sharing routes, such as email, dedicated upload links, airdrop-type features, or direct chats in platforms like Slack or Google Classroom. This straightforward sharing functionality complements the principles of effective online teamwork.
Key Takeaways
- Mastering shortcut keys can significantly enhance productivity when **taking screenshots in Chrome OS**.
- Utilizing the editing tools built into Chromebooks allows for professional and polished screen captures.
- Familiarizing yourself with various screenshot methods ensures you can capture images efficiently, regardless of your preferred technique.
- Exploring third-party applications can offer additional features tailored for specific needs and enhance your screenshot capabilities.
FAQ
1. How do I change screenshot settings on Chromebook?
You can adjust screenshot settings by navigating to the Quick Settings menu, where you can change default settings for how your screenshots are taken, the image format, and even where they’re saved. This personalization can enhance your screenshot productivity.
2. Can I annotate screenshots taken on my Chromebook?
Absolutely! Utilizing the **native screenshot tool,** you can quickly edit and annotate your screenshots. The built-in features allow for highlighting, text additions, and even cropping-oriented edits for clearer presentations of ideas or instructions.
3. Is there a help guide for capturing screenshots on Chromebook?
Yes! Online resources feature comprehensive **chrome screenshot guides** covering keyboard combinations, settings, and various screenshot functions. Seeking guidance through platforms like Google support can offer added insights into using your Chromebook effectively.
4. How can I access saved screenshots easily on my Chromebook?
To access saved screenshots, simply open the **Files app** and navigate to the Downloads folder. You can create specific folders to maintain an organized collection of your screenshots for easy access later.
5. What are the best practices for sharing screenshots on a Chromebook?
When sharing screenshots on your Chromebook, consider the format that best fits your needs—whether it be PNG or JPG. Ensure you’re utilizing direct sharing features from applications or uploading via cloud services can ensure quick dissemination of information. Keeping files organized will streamline this communication.